Mini milling machine


Mini milling machine
Published 2014-04-11T19:18:32+00:00
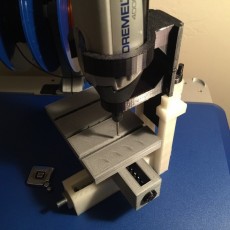
This is the first entirely 3D printed Mini Milling machine ever, it's suitable for Dremel 3000, you have just to print the pieces, turn 3 handles ( one for each axis ) and you will have your personal functional manual milling machine.
This machine is very precise even if it's made in plastic, you have to put grease between the sliding parts to lubricate the machine and eliminate the friction.
You can see how this machine works through this link:
http://www.youtube.com/watch?v=vytvQW01OUs&feature=youtu.be
Take a look also to the new Mini milling machine evolution


Print each part with the highest infill and 0.2 or 0.3 resolution, you have to print three screws, three c-rings and two block screws , afterward you have to remove the support material with some tools.
Now you can start to build your milling machine:
1) Insert the base 2 into the base perpendicularly, put grease onto the base channels and slide the parts.
2) Put grease into the base 2 threaded hole and insert a screw into the front hole of the base and push it until it touches the base 2 and screw it inserting in the screw block.
3) Insert the table into the base 2, lubricate and slide it again and insert the second screw.
4) Put some glue on the channels of the base and slide the tower onto it.
5) Lubricate the channels and insert the slide into the tower.
6) Put some glue between the top tower and the tower and press the two pieces together.
7) Lubricate the slide threaded hole and insert the last screw into the top tower hole, the slide threaded hole and the tower bottom hole.
8) To secure the screws attach the c-rings, you have to insert the c-rings onto each screws as shown in the picture and glue them together.
Suggestions: use a super glue and choose grease to lubricate the mechanisms.
| 发表的日期 | 11/04/2014 |
| 尺寸大小 | 154 mm / 120 mm / 154 mm |
| 复杂程度 | 非常困难 |

My print of this model came out very nice :)